Wednesday, 5 June 2013

iStopMotion & iMovie

iStopMotion

The software that I used to create my animation in was iStopMotion, in this programme you have to take a series of still images then when your finished it will play them all back together as an animation at 12 frames per second. When it comes to making your animation whether its real models or clay models you still need to move the slightly on each frame so that when the frames come together it looks like they are moving. To take the pictures theres a circular red dot that once you have clicked the takes the still frame image, you keep doing that until you are happy with your animation and finished. Once i had finished creating my animation i exported it into a movie file and saved it into my documents.

iMovie

I used the iMovie software edit my animation once i had finished making it in iStopMotion and i also added the credits on it in iMovie. I imported my animation into iMovie, then it came up with a selection of credit themes that I could use, i chose the 'Echo' credit for the beginning and the 'Rolling' credits for the end of my animation. I started off by dragging my opening credits into place, followed by little clips of my animation, once i had finished ordering everything i put in place my end credits. I then exported my animation from iMovie and placed it into my blog.

Extra work for my Animation

Research for Animations

This is a piece of animation done by Jan Svankmajers called 'FOOD' this was created in 1992.


This is a piece of animation done by the creators of PES animations called 'Fresh Guacamole' this was created in 2013.

I think this a really creative piece, it's very fascinating. It sounds very realistic with the sound effects that are used in it. 

Fresh Guacamole is the shortest film ever nominated for an Oscar.


This is a piece of animation done by Norman Mclaren called 'Neighbours' this was created in  1952.


Wednesday, 22 May 2013

How I Created My Animation

Planning Process:
Before I could even start to create my animation and models, I had to research and plan more into it. This consisted of mindmapping a few different ideas that I could use and resort to if I changed my mind at anypoint on what i wanted to base it on. I also had to research into what models i would use/make and how i could make them to have the effect of looking realistic, i drawn a few ideas on paper before i started to make them with clay. I also researched into the soundtracks that i could feature in my animation, i came up with about two or three which are listed in my 'Animation Ideas' blog post. I also had to download and covert my soundtrack so that it was ready to use and edit in when it came to making my animation.

Production Process:
After i had done all my planning and research I could start to create my models. I took the sample models that i had previously drawn out on paper and used them as a guideline whilst i was creating the actual clay models. This took me a few lesson to create them as i wanted them as detailed as i could get them so it would give my animation a realistic effect. I started with making the sunflower head, then the stem and then the butterfly and the grass. I would say that most difficult part of creating the models was making the sunflower as i had to be precise and carefull with the petals.
When it came to making my actual animation all i needed was a mac computer and a working camera. I started off by attaching a plain white A3 piece of paper as the background, I used this so that you couldn't see the table in the background of it, on that I then started by adding a little piece of grass at the bottom of the page and snapshotted it and repeated that until the grass was all along the bottom of the page; when played back this makes it look like its growing on the page. I then adding a little piece of the stem each time clicking the camera and repeated that also, i did the same all the way up the stem until the sunflower head appeared. I then slowly moved the butterfly all around the page, after each movement I made i clicked the camera icon to take the image of it and repeated so until i eventually moved it off the page. I then started to roll the grass ip each time so that it looked like it was dissapearing and did the same with the stem. When it was just the sunflower head left on the page i squished up into a ball and rolled it off the screen. I then exported it from iStopMotion and into my documents. It took me upto four+ lessons to create my models and one lesson to create the animation in.

Editing Process:
After I had created my animation, i then imported it into MovieMaker so that I could edit in the opening and ending credits along with my soundtrack. I chose to go with the soundtrack 'Seaside by The Kooks' it took me one lesson to do all the editing in.

Wednesday, 1 May 2013

Animation- Proposal

Brief
'At the end of the academic year, BTEC Media at Middlesbrough College is planning to stage a festival to celebrate student success and to showcase work produced by students at all levels. Previous expos have resulted in commissions for students and provide excellent experience. As your contribution to this expo, you are asked to produce an original animation sequence in a medium and technique of your choice, to run for a minimum of 20 seconds. This sequence must include titles, credits and audio. The content of the animation is your own, and could be based on an excerpt from a film, a joke, a song, or from your own imagination.'

Proposal
For this assignment the animation that I am going to produce is just a short simple one, I have chosen to create a 20-30 second animation showing sunflower being produced. The reason why i have chosen to base my animation around this is because I feel that its quite a simple animation to do and not many other people in the class have created anything like that. To make my animation video I will need an animation camera, the software that I will be using is iStop motion to create my animation in. I will be editing the clips using the iMovie software. I will add credits and a backing track to my animation. The reason why I will be editing in credits is so that my animation will look more advanced and a better quality. The backing track that i am using to go over the animation is going to be the tune of Bob Marleys- Dont Worry Be Happy. To get the music track i will convert it from Youtube using an online video converter and then dragging the music into garageband along with my animation. The reason that I am using this backing track is because it gives off a happy positive vibe. The equipment that I will be using to produce the animation will be a suitable camera that connects into the computer to use with the software, i will also be using the software programmes such as iMovie and iStop Motion. I will also be needing access to the internet so that i can do my research and convert my soundtrack from.

Wednesday, 24 April 2013

Animation- Evaluation

Brief 
'At the end of the academic year, BTEC Media at Middlesbrough College is planning to stage a festival to celebrate student success and to showcase work produced by students at all levels. Previous expos have resulted in commissions for students and provide excellent experience. As your contribution to this expo, you are  asked to produce and original animation sequence in a medium and technique of your choice, to run for a minimum of 20 seconds. This sequence must include titles, credits and audio. The content of the animation is your own, and could be based on an excerpt from a film, a joke, a song, or from your own imagination.'

Evaluation
Throughout the process of planning and the production of this assignment it had took me a few attempts to end up with a finished animation. This was due to problems with the software as i lost my work whole animation at first on iStop Motion as the programme crashed before i could save the work that i had already this resulted in me creating the whole animation again, Luckily for me i still had all the props that i had made and previously used. I also had a few problems with time and organisation. I didn't give myself a schedule to complete each task with, this made it more confusing for me as i was going back and forth from each task adding little bits at a time, as i find it easier getting each task done and completed separately. I also left it a little bit too late with some parts of the assingment as i spent most of my time on the planning process; this was because i kept changing my ideas of what i wanted the animation to be based on.

If i were to do this all again I would base it around something more interesting and more advanced than just staying with something on a simple basis, I would challenge myself a bit more to come up with something of a more professional standard.If i were to improve my finished animation i would recreate all my props so that they look of a better quality and take my time on making them instead of rushing the process. I would also give myself a time limit for each task, for example i would give myself one lesson to do the planning and researching in and maybe give myself three to four lessons actually creating the props, i would also make sure that i don't go over my time limit as this could cause me to be over due on the deadline. I would give myself two lessons for actually creating the animation in the software; one for which is the actual filming of it and the other for editing purposes. This would be a easier and more organised way which would be easier for me as if anything went wrong i could have time to fix the issue and still be finished my animation on time. I think that my finished animation overall is good, but could be a lot better! There's quite a few things that I would change about it; making it more interesting and of a professional standard! But overall i'm happy with how it turned out.

Finished Animation and Screenshots


This is sunflower head, i started by making this part of the flower itself as it's the most detailed part of my clay models that I needed to make. To make this i used the yellow and brown clay, and detailed it with the cutting tool to give it more a realistic look towards it.

I then created the stem of the flower and attached it to the flowerhead model,to make this i used the dark green coloured clay to give it more of a realistic effect. This is what it turned out like:


I then added parts of the grass to sit just at the bottom of them stem, i created this with dark green coloured clay and used the an object with a sharp edge to scrape at the clay to give it more a rough look effect and to make it look realistic.

After that I made a butterfly using the colours of yellow, green and orange. I got the idea of adding a butterly as the models are quite summery, and butterflys alway hover around the flowers in the summertime so this is where my inspiration to add this came from.


This is the lumo of grass that I created to use in my animation, i added a rough grassy effect on it to make it look realistic, in my animation this started to appear 'grow' at the bottom of the screen which from that a flower spouted.

Finished Animation


Wednesday, 27 March 2013

Animation Ideas

Ideas

  • The animation will start off with the grass growing on a white background, eventually a sunflower head and stem will appear and start to sprout.
  • A butterfly will  flying around once the flower itself has grown, the butterfly fly will fly all around the scene until it gradually disappears out of view.
  • This will last just over twenty seconds, no less.
  • I chose to stay with a simple and basic animation as this is my first attempt at ever creating an animation.
  • Clay props; butterfly, sunflower head and sunflower stem, grass.
  • The animation will be produced on iStop Motion, edited in iMovie.
  • The backing track that will be played over will be either 'The Kooks- Seaside' or 

Wednesday, 6 March 2013

Rollover Graphic

My Rollover:
A rollover image is a button that is used to provide interactivity between the user and the page itself. If you roll the mouse the cursor over the button it will react visually by changing the buttons source image with another image.


How I made it:


Rollovers from websites:

Image Links


My Image Link:                                                                      I have created a hotspot by selecting an image of Avril Lavigne from the internet search engine 'Google Images' and uploaded it into my blog, I then added a link onto the picture by highlighting it then clicking 'Link' and copied the web address that I wanted to use as the link across. For my image link i have used a photograph of Avril Lavigne and linked it to her clothing line 'Abbey Dawn' so that once the image has been clicked on it will take you directly to the site.
How i made it:
Firstly, I searched for a picture of my choice on google images and then saved it into my documents. I then opened up a new post on Blogger and added the image that I had chosen from my documents by clicking the 'Insert Image' button, it then brought up a folder where i could search my documents to select the image.Once I had selected the image it then opened it up on my my post, from there I clicked on my image and then the 'Link' button this then opened up a box where I could type in the URL of an address that I wanted to open up once the image has been clicked. I went online to Avril Lavigne's clothing line website and copied the URL over to blogger. My image link was complete after that step.
 
Image Links from Websites:

Wednesday, 13 February 2013

Movie Edit- Principles Speech


Animated GIFs from other websites

What is an Animated GIF?
An animated GIF works in the same way as traditional cartoon animation. The image file actually has multiple images stored inside of it, called frames. The frames are displayed in order, and can give the appearance of motion in the same way an animated cartoon does. An animated GIF can appear to be anything from an animated cartoon character to a rotating banner ad, depending on how fast the frames are displayed.
What are they used for?


I got this image from:
http://demo.pinmescript.com/pics/t/1707.gif


I got this image from:
http://static.fjcdn.com/gifs/mmmmmmm+donut.+100+oc+animated+gif+i+made+for+my_4a2d7d_3944935.gif

I got this image from:
http://bbsimg.ngfiles.com/14/19843000/ngbbs4a8b0c1f1151d.gif

Wednesday, 6 February 2013

Movie Edit- The Unsocial Network


Flash Symbol

I created a Flash Symbol in Adobe Flash. To create this I used a vector image that i had found off the internet search engine 'Google'. I then imported the image into Flash and created a keyframe for 100 frames, I then converted the image to a symbol. I then moved the image around the screen and motion tweened it.

Tuesday, 5 February 2013

People Animation

During the lesson we had to create an animation between our group. We chose to create a people animation, this is an animation made with using people instead of clay figures. We created this with the software application called iStop Motion, we took a series of still photographs that we then put together and ended up creating a nine second animation.

My Animated GIF


As part of one of my tasks for my assignment i had to create an animated GIF with a vector image that I had chosen off the internet in the software programme Flash. This is my animated GIF. Below is the steps of how I made it.


Screenshots:


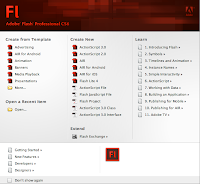
Firstly I opened up Flash, and created a new 'ActionScript 3.0' document. This then opened up a blank document.


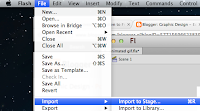
I then clicked onto 'File' which is located on the tool bar at the top of the screen, then i scrolled down to 'Import> Import to Stage'


 Once I clicked onto import it then brought up this little menu, I found the location of the folder where the image that I wanted to use was and selected it and then clicked on 'Open'.


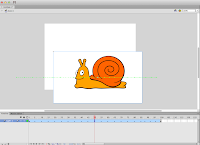
The image that I selected then appeared in the center bit of the screen which is called the Stage, this is where all the action stays and shows.


This is the keyframe this is where all the movement of the image is recorded, I set the keyframe up for 100 frames.


I then went back into the toolbar at the top of the screen and went into 'Insert>Timeline>Keyframe' this then set up the keyframe so that it could record movements.


This is the keyframe after I set it up as a keyframe, as you can see it shows me where my beginning and ending frames are.


I then went back into the toolbar and selected 'Insert>Motion Tween'. This is so that i am able to move the image about the screen with it noting down the movements so that i can play it back as a animated gif.
I then started moving my picture off the screen at the right hand side then slowly moving across the stage to the left hand side; as shown below:


This is where my image was before I started to move the image.


This is where my image was on the stage mid way through motion tweening it.


This is where I finished moving my images across the stage.


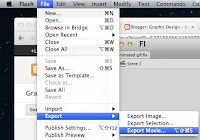
After i had made all the movements that I wanted to make and was happy with it i then could export the image by going on 'File>Export>Export Movie'.